Mac computers have a function that can hide files or folders from users to avoid accidental deletion of the essential system files. The lost system files of great importance may seriously impair system functions and performance, preventing your Mac from working correctly.
Calm down when you are about to access vital files or folders you need, but only to find that you can’t see them on your Mac machine. It doesn’t mean they are lost because they may be hidden on your Mac.
In this article, we will elaborate on a few ways to let your Mac show hidden files again. Let’s take a look at these possible methods. When you need to show hidden files on Mac, you can choose one to offer you help.
Why Are Files Hidden from View on Mac?
A hidden file or folder refers to the file or folder that your Mac operating system usually doesn’t present to you in Finder. Although they are hidden from view, they are still located in the Mac file directory.
When talking about why files or folders are hidden from view on Mac, different people have different ideas. However, the core reason for hiding files is to protect your macOS from being damaged by mistakenly deleting the necessary system-related files that help your Mac computer operate or run without a hitch. Besides, the files may be hidden by you on purpose if you are not willing to make others view them.
However, the files are hidden from view for whatever reason; you must be careful that you will not crash your system or cause data loss when you want to show hidden files on Mac again.
Solutions to Show Hidden Files on Mac
Method 1 Use Keyboard Shortcuts to View Hidden Files in Mac Finder
By default, Mac users cannot access hidden files on their Mac machines, but they can reveal the hidden files in Mac Finder through a keyboard shortcut.
Step 1 View the Mac Dock to find the Finder icon and then hit it.
Step 2 Choose the folder where you are about to show your hidden files.
In step 3, Hit the Command, Shift, and Period key combination. Then the files marked to be hidden will show up translucently in the folder. Hold down the same keyboard shortcuts when you hope to hide them again.

Method 2 Display Hidden Files via Mac Terminal
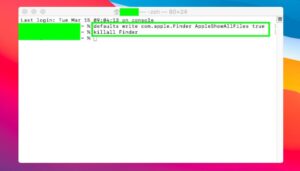
Mac has a text-based tool, Terminal, included in it. With the Terminal utility, you can use commands to perform an action to show your hidden files permanently.
Step 1 Navigate to Terminal by going to Launchpad > Other.
Step 2 Input the defaults, write com. apple. Finder AppleShowAllFiles true command in the Mac Terminal window and then hit the return button.
Step 3 Type killall Finder in the Terminal window and then hit the return key. After running the script, the Mac Finder will be forced to restart to make sure the new setting can take effect. Now, the hidden files will be displayed in Finder.

If you want to make the hidden files invisible after viewing them, you must follow all the abovementioned steps to hide them, but please remember to replace true in the second step with false.
Method 3 Find Deleted or Lost Hidden Files and Get them Back Using Third-Party Software.
Apart from the keyboard shortcut and Mac Terminal, a third-party program named iBoysoft Data Recovery for Mac can be used for finding your deleted or lost hidden files on Mac. After referring to both methods, the hidden files are still invisible, which indicates they may be accidentally deleted due to human error or lost due to virus attacks, system crashes, file system corruption, etc. Under such a situation, iBoysoft Mac data recovery software can come in handy.
As its name suggests, iBoysoft Data Recovery for Mac is a data recovery utility that can help you find and recover deleted/lost hidden files from your Mac hard drives, external hard drives, and other disk-based storage devices. This utility can retrieve different types of data, including Office documents, video files, audio files, pictures, and more. Equipped with advanced data recovery technology, this software can also support recovering lost data from MacBooks that won’t turn on, such as your Mac being stuck on the Apple logo, loading screen, or showing the prohibitory symbol on booting up.
Here is what you should do to get the deleted or lost hidden files back.
Step 1 Download iBoysoft Data Recovery for Mac from its official site and then install it on your Mac computer running with Mac OX 10.9 or higher versions.

Step 2 Launch this file recovery tool, select the drive that stores your missing hidden files from all industries listed on the software interface and press the Scan button. Generally, the scanning time depends on the number of files. If there are multiple files or large files, it may take longer to complete the scanning process.

Step 3 Preview the scanning result to check if the disappeared hidden files can be recoverable. Once you find the hidden files you want, tick the box before them and click the Recover button to put them back.

Final Verdict
The hidden feature offered by Mac can’t only protect your Mac OS from being damaged but also provides you with a second choice for hiding your vital files so as not to expose them to others.
This article introduces different ways to show hidden files on Mac. When you find you can’t see hidden files on your Mac machine, try the keyboard shortcut or Mac Terminal to display them. But suppose you fail to show hidden files after following the two solutions mentioned above. In that case, you can try iBoysoft Data Recovery for Mac to recover your deleted or lost hidden files.


Comments