In this comprehensive guide, we will walk you through the process of setting up an FTP server on Windows 10. FTP (File Transfer Protocol) is a standard network protocol used for the transfer of computer files between a client and server on a computer network. By setting up an FTP server on your Windows 10 machine, you can easily transfer files between devices on your network.
Before we get into the details, let’s have a look at some basics of ftp servers and setting up FTP servers on Windows 10.
Note: This section of the blog post is for absolute beginners. If you already have got an idea of the basics of FTPs, you can skip ahead directly to the Setting up an FTP Server on Windows 10.
Here’s a breakdown of the key components:
FTP Server
Definition: An FTP server is a software application or hardware device that runs FTP and manages the storage and retrieval of files on a computer network.
Function: It acts as a central repository for files, facilitating the transfer of files between devices connected to the network.
Role: The server responds to requests from FTP clients, allowing them to upload, download, delete, or modify files on the server.
FTP Client
Definition: An FTP client is a software application that enables users to connect to an FTP server and interact with it to transfer files.
Function: Clients initiate requests to the FTP server, specifying the type of action they want to perform (e.g., upload, download, delete).
Role: Users interact with the FTP server through a client to manage files on the server.
File Transfer
Upload The process of sending files from a client to the FTP server.
Download: The process of retrieving files from the FTP server to a client’s device.
Authentication
Username and Password: Users typically need valid credentials (username and password) to access an FTP server and perform file operations.
FTP Protocols
FTP (File Transfer Protocol): The standard protocol for transferring files between a client and a server.
FTPS (FTP Secure): An extension of FTP that adds a layer of security through encryption (SSL or TLS).
SFTP (SSH File Transfer Protocol): A secure file transfer protocol that provides secure authentication and encrypted data transfer.
How to setup an FTP server?
Setting up an FTP server is pretty straightforward!
The server holds the files, and the client is the gateway for accessing, downloading, or uploading those files. They can be on the same network or even miles apart (thanks to the internet).
FTP is kind of like a duo. It has two ports. One is for connecting, and one is for the actual file transfer. There are also two modes it can run in active and passive. Active mode has the client starting the connection, while passive mode lets the client handle both the connection and the data transfer.
Most organizations go for passive mode because it’s a smoother process. With this mode, the client takes charge of both channels. This means minimal fuss with the organization’s firewall. The connection is like a friendly wave from the client to the server. The data makes its way back without a hitch.
Long story short, it’s a win-win – users connect to FTP servers, and network security stays intact.
Setting Up an FTP Server on Windows 10
Setting up an FTP server on Windows 10 might not be the most straightforward task, but it’s definitely doable. You don’t have to switch to a server edition or dive into Linux if you’re uncomfortable with that. In this guide, we’ll walk through the process in a simple way.
Now, why would you even want to bother with an FTP server? Well, for one, it’s a handy solution for transferring large files without shelling out big bucks for cloud storage. Sure, for smaller files, cloud services like Google Drive make sense, but once your files start bulking up, so do the costs.
So, if you’re facing the dilemma of increasing cloud storage fees and want to explore an alternative, turning your Windows 10 into an FTP server could be the answer.
Stick around, and we’ll guide you through the steps.
Ready? Let’s dive in.
Prerequisites
Before we begin, ensure that you have the following prerequisites in place:
Step 1: Enabling the FTP Server Feature
The first step in setting up an FTP server on Windows 10 is to enable the FTP server feature. Follow these steps:

- Press the Windows key + X on your keyboard to open the Power User menu.

- Enter “appwiz.cpl” and Select “Programs and Features” from the list.

- In the Programs and Features window, click on “Turn Windows features on or off” in the left-hand pane.

- In the Windows Features window, scroll down and locate “Internet Information Services” and expand its node.
- Check the box next to “FTP Server” and “Web Management Tool” to enable the FTP server feature.
- Click “OK” and wait for the feature to be installed.
Step 2: Configuring the FTP Server
Once the FTP server feature is enabled, the next step is to configure the FTP server. Here’s how you can do it:

- Press the Windows key + S on your keyboard to open the Power User menu.
- Select “Windows Administrative Tools” from the list.

- Click on “Internet Information Services (IIS) Manager” to open it.
- In the IIS Manager window, expand the node for your computer in the Connections pane.

- Right-click on “Sites” and select “Add FTP Site” from the context menu.
- Follow the wizard to set up your FTP site. Provide the necessary information such as the site name, physical path, binding, and SSL options.
Step 3: Creating FTP Users
After configuring the FTP server, the next step is to create FTP users who will have access to the FTP site. Here’s how you can do it:

- Go to the “Settings” from the start menu.
- Now, choose the “Accounts” from the list.

- Click on “Family and other users” and then go to “Add someone else to this PC.”

- Now add a Microsoft Account or make a new one if you don’t have one.

- Open the IIS Manager if it’s not already open.
- In the Connections pane, click on your FTP site.
- Double-click on “FTP Authorization Rules” in the middle pane.

- Click on “Add Allow Rule” in the Actions pane.


- In the Add Allow Authorization Rule window, select “Specified roles or user groups” and click “Next.”
- Enter the username of the user you want to grant access to and click “Check Names” to validate the username.
- Click “OK” to create the authorization rule.
Step 4: Testing the FTP Server
Once the FTP server is set up and configured, it’s essential to test its functionality. Here’s how you can do it:

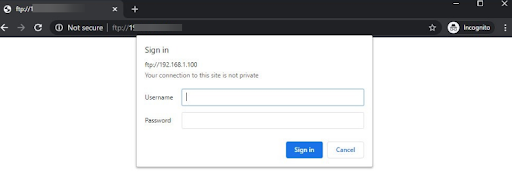
- Open the browser on another computer within the same network.
- In the address bar, type ftp://<your-ftp-server-ip-address> and press Enter.
- You will be prompted to enter the credentials of the FTP user you created earlier.
- Once authenticated, you should be able to access the FTP server and transfer files to and from it.
Conclusion
So, in short, the FTP server is a fundamental element in file management within a network. It facilitates efficient and organized sharing of files among users or devices. This makes it a valuable tool for businesses, web development, and various other applications where file transfer and collaboration are essential.
Setting up an FTP server on Windows 10 can greatly simplify the process of transferring files within your network. By following the steps outlined in this guide, you can easily configure an FTP server and start transferring files seamlessly.


Comments